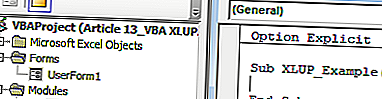
Excel VBA XLUP
สิ่งหนึ่งที่คุณต้องจำไว้ในขณะที่เขียนโค้ด VBA คือสิ่งที่คุณทำกับแผ่นงานปกติและคุณสามารถทำซ้ำสิ่งเดียวกันใน VBA ได้เช่นกัน คำหลักหนึ่งในการเข้ารหัส VBA คือ“ XLUP” ในบทความนี้เราจะแสดงให้คุณเห็นว่าคำหลักนี้คืออะไรในการเข้ารหัส VBA และวิธีใช้ในการเข้ารหัส
จะใช้ VBA XLUP ในการเข้ารหัสได้อย่างไร?
ต่อไปนี้เป็นตัวอย่างของ excel VBA XLUP
คุณสามารถดาวน์โหลด VBA XLUP Excel Template ได้ที่นี่ - VBA XLUP Excel Templateตัวอย่าง # 1 - ย้ายเซลล์ไปยังตำแหน่งที่ถูกลบของเซลล์
ตัวอย่างเช่นดูสถานการณ์ของข้อมูลด้านล่างซึ่งคุณต้องลบข้อมูลเซลล์สีเหล่านั้นและเพิ่มเติมข้อมูลแถวด้านล่างไปยังข้อมูลด้านบน
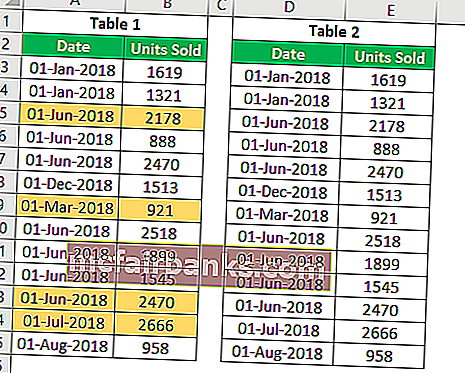
วิธีหนึ่งในการลบสิ่งนี้ในเวิร์กชีตคือการเลือกเซลล์ที่เราสามารถลบทั้งแถวได้เอง แต่ที่นี่สถานการณ์มีความยุ่งยากเล็กน้อยเพราะฉันมีเซลล์สีในตารางที่ 1 เมื่อเราลบทั้งแถวแม้กระทั่งตารางที่ 2 แถวก็ยังถูกลบ แต่เราไม่ต้องการให้สิ่งนี้เกิดขึ้นแทนเราเพียงแค่ต้องลบแถวสีและเซลล์ด้านล่างควรย้าย ขึ้นตำแหน่งของเซลล์ที่ถูกลบ
ขั้นแรกเลือกเซลล์ที่มีสีแล้วกดCtrl + เครื่องหมายลบ (-)เพื่อเปิดตัวเลือก“ ลบ”
ปุ่มทางลัดเพื่อเปิดตัวเลือก“ ลบ”

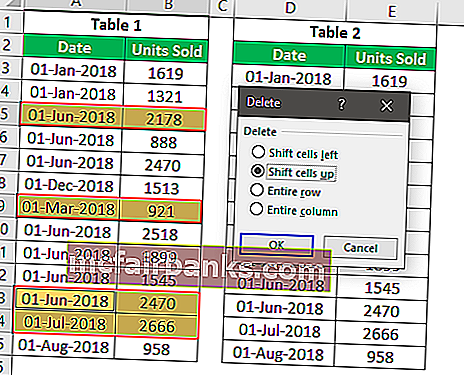
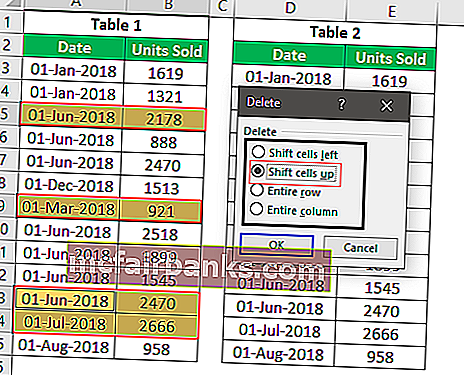
ในหน้าต่างตัวเลือก "ลบ" เรามีสี่ตัวเลือกเราสามารถเลือกการดำเนินการได้ตามความต้องการของเรา เนื่องจากเราจำเป็นต้องย้ายเซลล์ของเราขึ้นสำหรับตำแหน่งของเซลล์ที่ถูกลบเหล่านั้นให้เลือก“ Shift Cell Up”
เราจะมีตาราง 2 แถวที่ไม่เปลี่ยนแปลง

การดำเนินการนี้ใน VBA จำเป็นต้องใช้คุณสมบัติ“ XLUP” เพื่อดำเนินการชุดการดำเนินการที่คล้ายกันใน VBA ตอนนี้มาที่หน้าต่างของตัวแก้ไข VBA และเริ่มชื่อมาโครของคุณ
รหัส:
Sub XLUP_Example () End Sub
ขั้นแรกให้จัดหาเซลล์ RANGE ที่จะรวมในการดำเนินการนี้ ในการดำเนินการนี้เซลล์แรกที่จะถูกลบและเลื่อนขึ้นคือเซลล์“ A5: B5”
รหัส:
Sub XLUP_Example () ช่วง ("A5: B5") End Sub 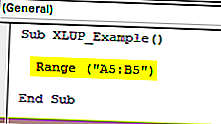
สำหรับช่วงของเซลล์นี้ให้เลือกวิธี "ลบ"
รหัส:
Sub XLUP_Example () Range ("A5: B5") ลบ End Sub 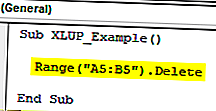
ดังที่คุณเห็นสำหรับเมธอด“ Delete” เรามีอาร์กิวเมนต์ที่เป็นทางเลือกหนึ่งรายการเป็น[Shift]สำหรับอาร์กิวเมนต์นี้เราต้องป้อนอาร์กิวเมนต์เป็น“ XLUP”
รหัส:
Sub XLUP_Example () ช่วง ("A5: B5") ลบ shift: = xlUp End Sub 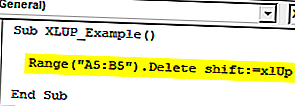
ตอนนี้คุณสามารถเรียกใช้รหัสนี้ด้วยตนเองหรือผ่านทางลัด excel คีย์ F5 เพื่อดูผลลัพธ์
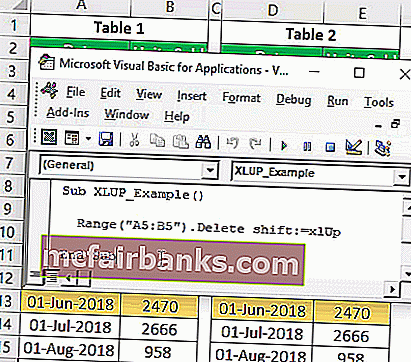
ดังที่คุณเห็นในตารางที่ 1 เราได้เลื่อนแถวที่ 6 ไปยังแถวที่ 5 และในทางกลับกันตาราง 2 แถว (สี) ไม่เปลี่ยนแปลงดังนั้นการใช้ตัวเลือก“ VBA XLUP” เราสามารถดำเนินการนี้ได้โดยใช้ตัวเลือก“ VBA XLUP”
ตัวอย่าง # 2 - ค้นหาแถวที่ใช้ล่าสุดโดยใช้ XLUP
ลองนึกภาพสถานการณ์ที่คุณอยู่ในเซลล์ A20 (ดูภาพด้านล่าง) และเซลล์ที่ใช้ล่าสุดของคุณคือ A14
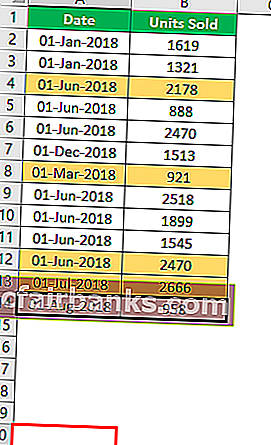
ตอนนี้ถ้าคุณต้องการเลือกเซลล์ที่ใช้ล่าสุด (A14) คุณจะทำอย่างไรโดยใช้คีย์ลัด ???
เราจะใช้ปุ่ม Ctrl + Up Arrowเพื่อย้ายไปยังเซลล์ที่ใช้ล่าสุดจากตำแหน่งปัจจุบัน
ปุ่มทางลัดเพื่อย้ายไปยังเซลล์ที่ใช้ล่าสุด


ดังนั้นจากเซลล์ปัจจุบัน Ctrl + ลูกศรขึ้นจึงเลือกเซลล์ที่ใช้ล่าสุด ในทำนองเดียวกันในการเข้ารหัส VBA เราใช้END (XLUP)เพื่อดำเนินการเช่นเดียวกัน
กลับมาที่หน้าต่างการเข้ารหัส VBA
In this window, we will perform the task of finding the last used row in the worksheet. Create a new subprocedure in the VBA window.
Code:
Sub XLUP_Example1() End Sub
To store the last used row number. define the variable as the VBA LONG data type.
Code:
Sub XLUP_Example1() Dim Last_Row_Number As Long End Sub
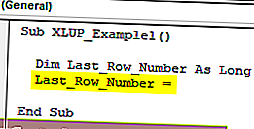
Now for this variable, we will assign the last used row number.
Code:
Sub XLUP_Example1() Dim Last_Row_Number As Long Last_Row_Number = End Sub
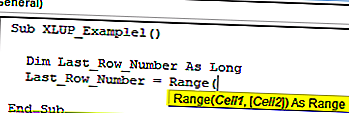
Now use RANGE object and open this object.
Code:
Sub XLUP_Example1() Dim Last_Row_Number As Long Last_Row_Number = Range( End Sub
Now mention the active cell (A20) for RANGE object.
Code:
Sub XLUP_Example1() Dim Last_Row_Number As Long Range("A14").Select Last_Row_Number = Range("A20") End Sub 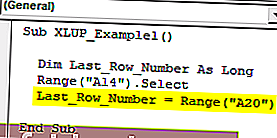
Now open END property for supplied range cell.
Code:
Sub XLUP_Example1() Dim Last_Row_Number As Long Range("A14").Select Last_Row_Number = Range("A20").End( End Sub 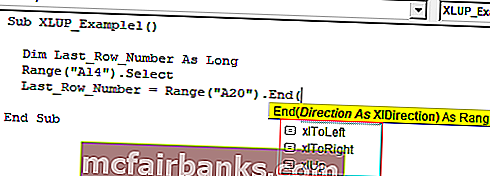
As you can see above, we have to arrow key options like “xlDown”, “xlToLeft”, “xlToRight”, “xlUp”. Since we are moving up from the A14 cell choose the “VBA XLUP” option.
Code:
Sub XLUP_Example1() Dim Last_Row_Number As Long Range("A14").Select Last_Row_Number = Range("A20").End(xlUp) End Sub 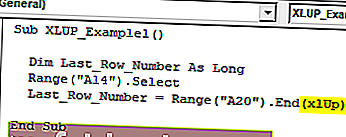
After moving up from A14 cell we need to mention what we need to do since we need the last used row number I will use ROW property.
Code:
Sub XLUP_Example1() Dim Last_Row_Number As Long Range("A14").Select Last_Row_Number = Range("A20").End(xlUp).Row End Sub 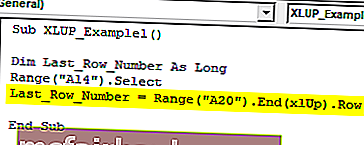
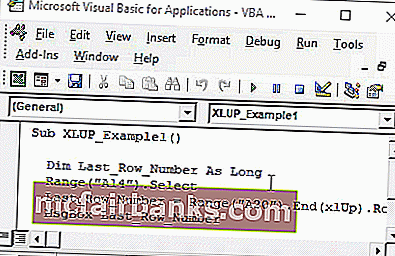
Now for the message box assign the value of variable “Last_Row_Number”.
Code:
Sub XLUP_Example1() Dim Last_Row_Number As Long Range("A14").Select Last_Row_Number = Range("A20").End(xlUp).Row MsgBox Last_Row_Number End Sub 
Now you can run this code manually or through shortcut key F5, to see the result.
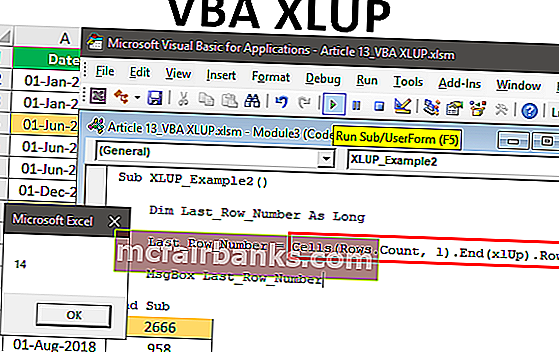
So message box showing the last used row number as 14, so our last data used row number is A14 cell.
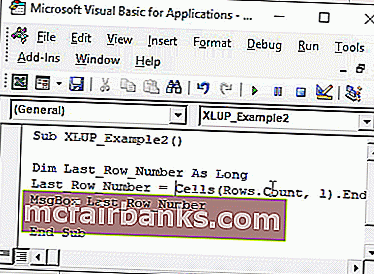
In this case, since data is very small we started from A20 cell but when the data is large we cannot say which cell to take into consideration first, in such cases we need to employ a different technique.
We need to use CELLS property, below is the example of the same.
Code:
Sub XLUP_Example2() Dim Last_Row_Number As Long Last_Row_Number = Cells(Rows.Count, 1).End(xlUp).Row MsgBox Last_Row_Number End Sub
Now you can run this code manually or through shortcut key F5, to see the result.
Instead of a RANGE object, I have used CELLS property. Let me explain this in detail to you.
ROW.COUNT this will count how many rows are there in column 1. What this will do is it will take into consideration of the last cell in the worksheet instead of random cell address, in the above case we have used A14 as the random cell address.
Things to Remember about VBA XLUP
- XLUP is the word used in VBA code to replicate the action of the “Up Arrow” key in excel.
- VBA XLUP is used to move from active cells to the above cell or last used cell.
- XLUP is generally used along with END property in VBA.